Children''s competition categories in Kainuu O Week – introducing the courses for 8–10-year-olds
Published: 27.01.2025
The difficulty and length of courses for children and youth in orienteering competitions gradually increase from one age category to the next. During Orienteering Week, the youngest competition category is for 8-year-olds, followed by categories spaced 1–2 years apart. The courses for 8–10-year-olds are called “RR routes” (from the Finnish rastireitti, or control point route). Boys’ categories are marked with an H (for herrat, gentlemen), and girls’ categories with a D (for daamit, ladies). For example, H8RR refers to the control point route for 8-year-old boys, and D8RR for 8-year-old girls.
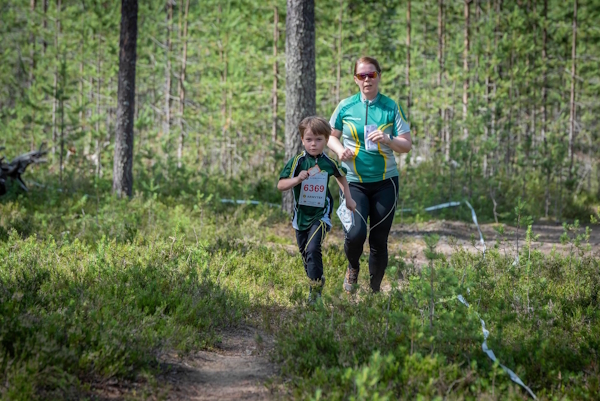
Typically, children and young people compete in their own age category, but if they wish for a greater challenge, they can compete in an older category. In competition categories, children and youth must orienteer on their own, while in open categories, parents or friends can accompany them if necessary.
In RR courses, a white or yellow continuous ribbon (siimari) is laid out in the terrain to guide the orienteer safely from one control point to the next. The control points are located along this ribbon. In the H8RR category, the ribbon is white for the entire route. In the 9RR and 10RR categories, the ribbon starts as yellow but turns white at the third control point. After the third control point, the routes for the H8RR, 9RR, and 10RR categories share the same path.
On the map, the ribbon for the participant’s own course is shown as a solid line, while the ribbon for other courses is shown as a dashed line. This way, the orienteer can see both ribbons on the map and use them to navigate as needed. The ribbon supports the orienteering performance and offers safe route choices. Course planners carefully design the ribbon path to provide options for both beginners and more experienced orienteers. The ribbon’s purpose is to enhance safety, and participants can use it as much or as little as they wish.
The most skilled orienteers may choose routes that bypass the ribbon entirely between control points. This allows them to challenge themselves by making shortcuts or taking alternate paths through the terrain, such as following a trail directly from one ribbon section to another, rather than sticking to the full ribbon path.
For the most advanced participants, the ribbon also offers route options where one might need to backtrack along it to find a trail leading toward the next control point. This encourages participants to test and improve their orienteering skills. In some cases, control points can even be approached from behind by following the ribbon.
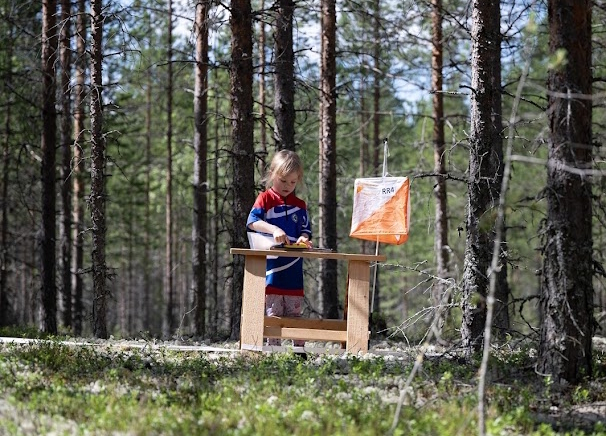
When a child or youth participates in an orienteering competition for the first time, it is important to review the basic procedures with a parent or an experienced orienteer. The first step is to check the location of the last control point from the finish area. If there are multiple finish lanes, it is helpful to know in advance which lane to enter. Nowadays, Kainuu Orienteering Week has separate finish lanes for competition and open categories, marked with signs at the end of the finish stretch. Officials are also stationed at the start of the lanes to guide participants.
To find the starting area, follow the “To the Start” signs from the competition center. The start area for children’s courses is designated as Start 4. Participants should arrive at the start area five minutes before their designated start time, at which point they will be called to the first start box. Officials at the start area guide children through the starting process and provide assistance if needed. Children aged 10 and under can receive guidance on their course two minutes before starting.
Near the competition center’s guidepost, there is a demonstration control point, and at the start area, there is a demonstration control for RR routes. Participants can use these to test their EMIT card. Before the race begins, it is also advisable to check the start lists to ensure the EMIT card number is correct and report any discrepancies to the information desk.
The H8RR course is designed to be safe for beginners. Participants can follow the ribbon for the entire route, as all control points are along it. There are also shortcut options that utilize clear landmarks, such as trails. These shortcuts encourage children to think critically as they choose the correct path at intersections. If a child accidentally takes the wrong path, the ribbon will eventually appear, guiding them back on track and prompting them to rethink their navigation. The ribbon then provides a secure route forward.
The initial part of the H8RR course is shorter than the corresponding sections in the 9RR and 10RR courses. While shortcuts are available, following the ribbon for the entire route does not significantly increase the total distance. The shortcuts on the H8RR course are simpler and more clearly defined than those in the 9RR and 10RR courses. Even when taking a shortcut, participants can usually see the ribbon at all times.
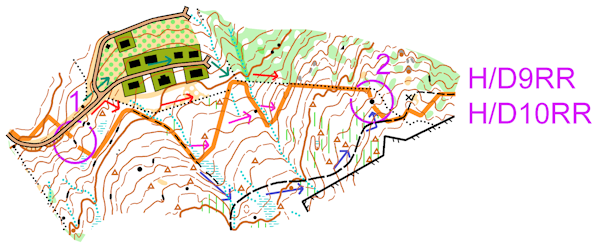
The purpose of the H9RR and H10RR courses is to offer children a range of route options, allowing them to choose a level of challenge appropriate for their skills. There are larger shortcuts available, which still follow clear landmarks, such as trails or distinct terrain features. On some segments, participants can briefly backtrack along the ribbon to reach a road or trail leading toward the next control point. Compared to the H8RR course, the shortcuts on the H9RR and H10RR courses are more demanding, including options like following forest edges or other terrain boundaries. However, participants can always choose to follow the ribbon for the entire route if they feel unsure about taking shortcuts.
The H10RR courses are designed to help children build confidence by making small shortcuts, taking advantage of the good visibility in the terrain. Course planner Joona Hirvilahti explains, “In this scenario, it’s crucial to ensure no control points are skipped during the shortcuts.”
RR courses are typically set in easy-to-traverse, open terrain, ensuring even the youngest participants can navigate smoothly. The openness of the terrain also makes shortcuts safer, as children can see the ribbon ahead and adjust their route accordingly.
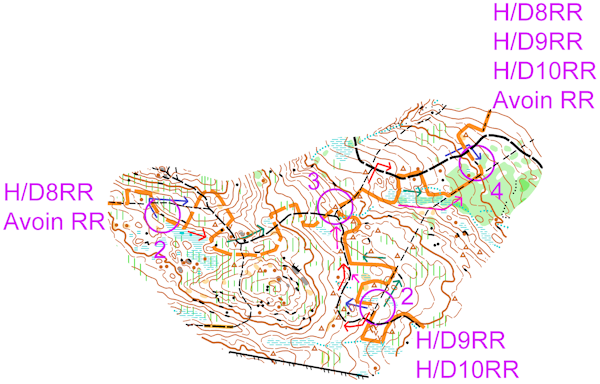
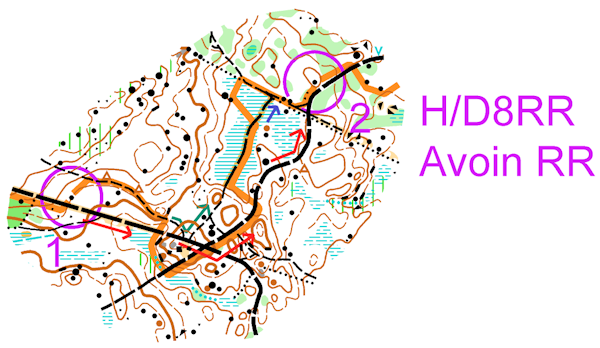
Here in the image, you can see how the 8RR and 9–10RR courses differ up to the third control point and how the orienteering tasks for these classes vary. After the third control point, the courses are the same for both.
One route choice for the 8RR class between control points 2 and 3 is to turn back along the guiding tape (blue arrow) from control point 2 and take the path leading to the control point. A second option is to follow the guiding tape the entire way, and a third option is to cut across the edge of the marsh to the path (red and green arrows).
The initial part of the 9–10RR course is slightly longer than the 8RR course and presents a bit more navigational challenge. In the image, one route choice for the 9–10RR class between control points 2 and 3 is to follow the guiding tape. A second option is to follow the tape for a while from control point 2 and then continue on the path toward the control (green arrow). A third option is to turn directly onto the path from control point 2 and follow it (red arrow). A fourth option is to go straight from control point 2 to the path and then follow it to the control (blue or olive-green arrow).
The third control point is the first shared control point for both courses, and the remaining course to the finish is identical for both. At the third control, a staff member is available to guide the participants in the correct direction along the shared guiding tape toward the fourth control, if needed. From this point onward, the guiding tape in the terrain is white.
In the image, between the third and fourth controls, there are three clear route choices in addition to simply following the guiding tape. One option is to leave the tape early, continue straight along a path, and turn right at a crossing path (red arrow). You follow this path until the tape crosses it, then turn right to follow the tape toward the control (blue arrow).
A second option is to follow the guiding tape until it reaches a main path, then continue straight along the path. When the tape departs into the forest, continue straight on the path until the tape crosses it. At that point, turn right along the tape toward the control (blue arrow).